Another video upload, this time I am colouring the digi stamp 'Flapper Twirl'.

Showing posts with label Tutorial. Show all posts
Showing posts with label Tutorial. Show all posts
Monday, March 20, 2017


Thursday, March 16, 2017
COPIC COLOURING TUTORIAL - SWING GIRL
Just updated my channel with a new speed colouring video using Copics! I am colouring a simpler image called 'Swing Girl'. Do check it out!
Thursday, September 1, 2016
ONLINE SHOPPING DEALS, CASHBACK AND MORE WITH SHOPBACK!
Online Shopping
Ah yes the convenience of the internet!! Not only is e-shopping made cheaper, more time saving, and anything (well *almost* anything) can be purchased at the click of a button, now there are sites that provide $$$ back whenever you shop at major online retailers!! Wait... usually I only get cashback for in-person local transactions via my Mastercard? Or usually I hunt down coupons the old fashioned way for savings.
If you like shopping online I'm sure you use at least one of these:
- EBAY!! (US Ebay ftw)
- Taobao
- Aliexpress
- Fairprice online
- Groupon
- Expedia
- Zuji
- Lazada
- ASOS
- Zalora
- Uber
- Foodpanda
- Cathay Cineplex
- Agoda
- Reebonz
- Hotels.com
- Jetstar
.... just to name a few. They have hundreds more if you look under their categories.
SHORT TUTORIAL:
Simple instructions: https://www.shopback.sg/how-it-works
How to use Shopback:
- Set up a free account
- Verify your e-mail account and set up your account details.
Before shopping, remember to:
- Turn off ad-blocker if you have installed the add-on on your browser.
- Make sure your browser allows cookies: use Firefox, Safari, Chrome, Internet Explorer
- Clear the cache from your browser.
The process:
- While logged in, click on the shopping links and copy coupon codes (if any) via the Shopback site, you should read the Terms and Conditions as each vendor has different rules.
- You must shop WITHIN the new tab that has opened.
- Avoid clicking on other links after this new tab, or Shopback will not be able to track your cookies. The last link you should click is Shopback's tab.
- Shop away! Apply coupon (if any) and check out with payment.
- Wait up to 48 hours for the vendor to process. Don't panic yet if you don't see anything reflected in your account, just be patient.
- If successful, your account in Shopback should reflect the cashback under 'My Cashback'.
- They allow you to cashout for $10 and above, that's it!
Read the full info in their Help Center if you run into any problems.
Official video tutorial.
If you are unsure, make a small purchase first and wait 48 hours to check if you did it right!
 So the first thing I tried was Ebay. Find the Ebay's page on Shopback. Currently they offer 1% cashback.
 Their terms and conditions, it doesn't apply to certain categories.
 Wait for it to load and a new tab will appear.
 The Ebay address should read with an affiliate link on the back. I did not purchase from "my eBay" where I saved my favourites list. Not too sure if cashback would work here (maybe it might).
Don't click on the eBay logo home button on the left, the affiliate link disappears and goes to Ebay.com which means it lost its tracking. If you did that, start over again from Shopback.
Anyhow I used the default search bar to play safe.
 Ah yes...
Found the listing, checked out with payment as usual.
Nothing is reflected on my Shopback at first so I waited 2 days and there it is. I got back 37 cents, and it will be redeemable in 58 days, keep accumulating and withdraw after it hits the $10 threshold.

The extra $5 is a bonus when you sign up and make your first purchase. To receive it, check your email, they should send another email after verification to prompt you to complete your profile and account. The bonus will be credited after 48 hours.
They have a Cashback Buddy add-on for Chrome & Safari browsers for easy access so you can tell if the cashback is activated/ available on the shopping site. I will install that.
Just want to make a quick mention about China's equivalent of Ebay -
TAOBAO
I used to pay a local 3rd party agent who tacked on freight and commission as I couldn't set up an Alipay account, but it looks like Taobao has now allowed Singapore & Malaysia accounts so you can create your own Taobao and Alipay accounts, the site is in Chinese by the way. So I'm taking it that I get savings on commish + shipping + cashback, which is great.
Part 2 video is instruction on how to set up Alipay, even if you are not using Shopback it is still informative. I will give this a try if anything catches my eye there. The videos come in 5 parts so please view them for the complete tutorial.
 I use AliExpress for purchasing packing supplies, but this would only work for new accounts set up after 27 July 2016. Currently they are offering 5% cashback!
Click here to save with an Aliexpress coupon.
HOW TO USE ON EBAY:


Don't click on the eBay logo home button on the left, the affiliate link disappears and goes to Ebay.com which means it lost its tracking. If you did that, start over again from Shopback.
Anyhow I used the default search bar to play safe.

Found the listing, checked out with payment as usual.
Nothing is reflected on my Shopback at first so I waited 2 days and there it is. I got back 37 cents, and it will be redeemable in 58 days, keep accumulating and withdraw after it hits the $10 threshold.

The extra $5 is a bonus when you sign up and make your first purchase. To receive it, check your email, they should send another email after verification to prompt you to complete your profile and account. The bonus will be credited after 48 hours.
------
They have a Cashback Buddy add-on for Chrome & Safari browsers for easy access so you can tell if the cashback is activated/ available on the shopping site. I will install that.
------
Just want to make a quick mention about China's equivalent of Ebay -
TAOBAO
I used to pay a local 3rd party agent who tacked on freight and commission as I couldn't set up an Alipay account, but it looks like Taobao has now allowed Singapore & Malaysia accounts so you can create your own Taobao and Alipay accounts, the site is in Chinese by the way. So I'm taking it that I get savings on commish + shipping + cashback, which is great.
Part 2 video is instruction on how to set up Alipay, even if you are not using Shopback it is still informative. I will give this a try if anything catches my eye there. The videos come in 5 parts so please view them for the complete tutorial.
-----

Click here to save with an Aliexpress coupon.
-----

One of the highest cashbackers would be Lazada.sg: they offer 2%-12% cashback depending on what you buy. Some of their popular products are listed on Shopback too.
You can grab a Lazada coupon here.
You can grab a Lazada coupon here.
-----
Lastly, check out their site at the upcoming 99 Cashback Day launching on 1 Sept 2016 for their 2nd anniversary!
Shopaholics, give it a try! It's a smarter way to shop.
P.S. Appreciate it if you would use this referral link:
https://www.shopback.sg/?raf=yKL7mN
if you want to sign up for Shopback! You can invite your friends for similar rewards after that, thank you so much and thanks for reading!
Thursday, July 21, 2016
BAKING COOKIES LADY DIGI STAMP VIDEO & A PAYPAL RANT

https://www.etsy.com/listing/453518234/baking-cookies-girl-digital-stamp-digi
I have also made a quick video showing the inking process just for fun!
These past few weeks have been busy and worrying, as my mother had been diagnosed with cancer and next week will be the results and more followup appointments and consultations, so I am occupied.
Not only that, the 'Seller beware!' warning has finally rang true for my other shop. I've always known this but seldom shipped overseas; but wow that was quick, considering my new shop is only a few months old and I don't even have 40 sales yet lol. The combination of overseas packages (note, tracking & signature confirmation included, but for some reason doesn't count for honest sellers) via USPS
-Rant over
Thanks for bearing with me! I'll be posting some local visits including the now-closed Underwater World I went with my mom before she had the diagnosis. Also thanks to my great DT to help run my challenge blog!
Thursday, June 9, 2016
VIDEO: INKING MY LINEART & NEW DIGI!
Just made a new video while inking my sketch, this one will be titled 'Idyllic Garden'! It is the next digi stamp coming up. You can click directly to Youtube to view it in high resolution and subscribe to my channel if you wish!
New digi 'Idyllic Stroll' listed in my shop! You can get it here:
https://www.etsy.com/listing/385161508/
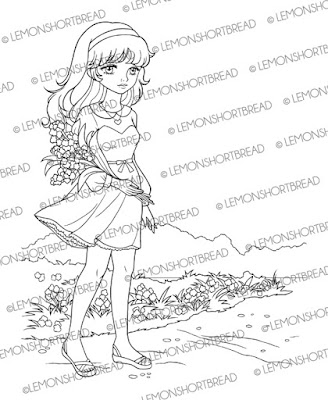
Idyllic Garden is now available!
https://www.etsy.com/listing/386125944/

New digi 'Idyllic Stroll' listed in my shop! You can get it here:
https://www.etsy.com/listing/385161508/

Idyllic Garden is now available!
https://www.etsy.com/listing/386125944/

Friday, March 18, 2016
MONAMI BAUHAUS COLOURED PENCILS DEMO & REVIEW
Made a short video demo / review on Monami's Bauhaus 36-clr Coloured Pencils. Hope you find it useful. Monami is a Korean stationery company and these pencils come in a pretty tin box. They are wax-based. If you are in Singapore, they can be purchased from Popular bookstore. I personally only use them for simple colouring as the leads are too waxy for me.
Wednesday, February 3, 2016
VIDEO TUTORIAL: HOW TO COLOUR WITH COPIC MARKERS ON ISLANDER DIGI

Part 1: Face, Dress, Accessories
Part 2: Hair, finishing & background
Hope you find the video useful. I am not a pro with markers and tend to avoid high contrast shadows, also I don't have that many colours lol. You can view it on youtube if the resolution here is too small. Sorry about the lighting and exposure. It was getting dark.

The lineart is available here:https://www.etsy.com/sg-en/listing/265479600/
Friday, January 1, 2016
COLLEEN COLOURED PENCILS REVIEW
Wishing everyone a Happy New Year! What did you do on New Year's Eve? Well
I made a short video demo with Colleen coloured pencils if you ever wondered about how they perform. Yup while the fireworks were going off in the horizon lol.
Colleen pencils are considered student's grade within the low price range, and are mostly used by childen in Asia. Since colouring books are quite popular now, adults and even artists worldwide are starting to discover them. They used to be made in Japan but are currently based in Thailand, of which the quality feels the same. You can get them on Amazon or Ebay.
They are much waxier, smoother and softer than my other pencils like say... the Luna Staedlers which I had as a child. I don't know exactly how good they are for professional work, because colour pencils are not my forte and I have never tried out professional grade pencils. I DO know I have a soft spot for them as they had the cutest, prettiest packaging back in the 70s-80s and all the cool kids had them in school because they were pricey back then, even the ones in default orange cartoon cardboard packaging. My absolute faves are the ones with shoujo illustrations on tin.
 https://www.etsy.com/sg-en/listing/215603558/vintage-1984-little-twin-stars-sanrio
by Lemonshortbread on Etsy
Takahashi Macoto's shoujo girls were featured on many of the boxes. Can you tell why I am biased much?!
 https://www.etsy.com/sg-en/listing/247546167/vintage-colleen-japanese-makoto-1980s
by PreppyPastel on Etsy
One of my fave shops on Etsy!
 https://www.etsy.com/ca/listing/240463119/vintage-cute-japan-rare-macoto-t-art
by GGdolls on Etsy.
This was the one I've used before in kindergarten or sunday school, unfortunately it wasn't mine but school property. All I did was stare at the packaging, I am not kidding.
 This is a very cool site if you love vintage shoujo!
http://www.harapekodoggybag.com/vintage-macoto-takahashi-makoto-lady-12-color-pencils-colleen-stationery-retro-girl-big-eyes-1970.html
Think I've strayed off topic, anyhow I will post another more in-depth text review. Hope you enjoyed the video anyhow, 'like' and subscribe on youtube if you wish!
Colleen pencils are considered student's grade within the low price range, and are mostly used by childen in Asia. Since colouring books are quite popular now, adults and even artists worldwide are starting to discover them. They used to be made in Japan but are currently based in Thailand, of which the quality feels the same. You can get them on Amazon or Ebay.
They are much waxier, smoother and softer than my other pencils like say... the Luna Staedlers which I had as a child. I don't know exactly how good they are for professional work, because colour pencils are not my forte and I have never tried out professional grade pencils. I DO know I have a soft spot for them as they had the cutest, prettiest packaging back in the 70s-80s and all the cool kids had them in school because they were pricey back then, even the ones in default orange cartoon cardboard packaging. My absolute faves are the ones with shoujo illustrations on tin.

by Lemonshortbread on Etsy
Takahashi Macoto's shoujo girls were featured on many of the boxes. Can you tell why I am biased much?!

by PreppyPastel on Etsy
One of my fave shops on Etsy!

by GGdolls on Etsy.
This was the one I've used before in kindergarten or sunday school, unfortunately it wasn't mine but school property. All I did was stare at the packaging, I am not kidding.

http://www.harapekodoggybag.com/vintage-macoto-takahashi-makoto-lady-12-color-pencils-colleen-stationery-retro-girl-big-eyes-1970.html
Think I've strayed off topic, anyhow I will post another more in-depth text review. Hope you enjoyed the video anyhow, 'like' and subscribe on youtube if you wish!
Saturday, September 5, 2015
HOW TO BOOT SNOW LEOPARD FROM USB STICK
I recently had to do this and thought to document it in my blog. Here is a step-by-step guide that may help you to boot the Snow
Leopard OS from a USB stick. A few reasons why you may like to boot from a USB stick:
- You don't have a dvd drive
- Your dvd drive doesn't work anymore
- It is quicker to boot from a USB stick compared to the dvd-rom
- A USB stick is more convenient to keep
For my case, the dvd drive no longer reads disks and I am needing the Disk Utility repair function in the install dvd-rom because of an error caused after an improper shutdown. I am not re-installing OS X and have not tried, but it probably will work too.
My OS is 10.6.8 (Snow Leopard).
My laptop is an Intel-based Macbook Pro (mid-2009).
Note: This tutorial will probably not work for PowerPC Macs
What you need to create a bootable USB drive:
- USB stick 8gb or more
- Original Mac OS X Install dvd-rom (mine is 10.6)
- Another computer that has a working dvd drive
- Program that can create/clone disk image (I used Daemon Tools)


I used a Windows PC to clone the dvd-rom. Using whichever software you please, create a new disk image of the DVD-rom, save your file as a .iso. Name it something you can identify. Mine is "MAC OSX.iso". A .dmg will also work if you are cloning off another Mac. This might take a few minutes depending on how fast your computer is.
 Transfer the .iso file back into your Macbook Pro, your desktop is a convenient location. I just used the same USB stick to duplicate the file onto the desktop. It is a 7.77gb file.
Next, you need to reformat the USB stick so it is Mac-bootable.
I am using a 4gb usb stick as an example for the screenshots so please ignore that.
Make sure you have backed up whatever content is in it as partitioning will erase everything. You can erase the USB stick first if you wish, using the 'Erase' tab in Disk Utility.
Under Partition tab:
 Select:
- Volume Scheme > '1 Partition'
- Name: whatever you wish
- Format: 'Mac OS Extended (Journaled)'
(ignore my size please, it is just example, you need a usb stick 8gb or larger and it will reflect that)
- Check Partition Map Scheme is 'GUID Partition Table'. Mine is 'Master Boot Record' (for windows) so I will have to change that.
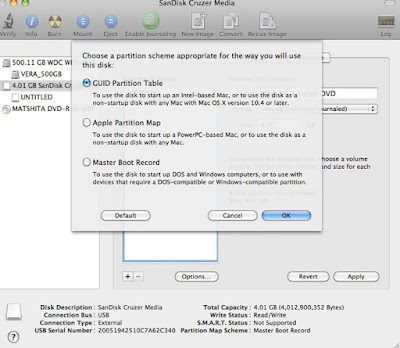
Click Options and select 'GUID Partition Table', click OK. Skip this step if it is already GUID.
 When successful, the Partition Map Scheme will reflect GUID.
Now you have everything ready and filled in, click Apply.
Next, Under Restore tab:

Double click the .iso file on your desktop to mount it. A pop-up window will appear as well as the volume on the left menu. Ignore the pop-up window.
 - Drag the .iso volume (not the iso title but the volume) onto 'Source', a green + button will appear when it is able to.
- Drag your USB partition (which you have now renamed) onto 'Destination'. Again, green + button will appear when it is able to.
- Click "Restore" button.
- The process will take some time, mine took about 55 minutes.
Your usb stick should be ready after it has completed restoration.
To boot from the usb stick, shut down or restart the computer and hold Alt/Option button while starting up (before the chime). This will take a few moments so keep your finger on it.

If successful, you will be able to choose the startup disk to boot from. Use the arrow keys to choose the USB Mac OS X Installer and hit enter. The language options will appear and you can do whatever you need to, by using the options in the top menu.
Hope this helps!
- You don't have a dvd drive
- Your dvd drive doesn't work anymore
- It is quicker to boot from a USB stick compared to the dvd-rom
- A USB stick is more convenient to keep
For my case, the dvd drive no longer reads disks and I am needing the Disk Utility repair function in the install dvd-rom because of an error caused after an improper shutdown. I am not re-installing OS X and have not tried, but it probably will work too.
My OS is 10.6.8 (Snow Leopard).
My laptop is an Intel-based Macbook Pro (mid-2009).
Note: This tutorial will probably not work for PowerPC Macs
What you need to create a bootable USB drive:
- USB stick 8gb or more
- Original Mac OS X Install dvd-rom (mine is 10.6)
- Another computer that has a working dvd drive
- Program that can create/clone disk image (I used Daemon Tools)


I used a Windows PC to clone the dvd-rom. Using whichever software you please, create a new disk image of the DVD-rom, save your file as a .iso. Name it something you can identify. Mine is "MAC OSX.iso". A .dmg will also work if you are cloning off another Mac. This might take a few minutes depending on how fast your computer is.
Next, you need to reformat the USB stick so it is Mac-bootable.
I am using a 4gb usb stick as an example for the screenshots so please ignore that.
Make sure you have backed up whatever content is in it as partitioning will erase everything. You can erase the USB stick first if you wish, using the 'Erase' tab in Disk Utility.
Under Partition tab:

- Volume Scheme > '1 Partition'
- Name: whatever you wish
- Format: 'Mac OS Extended (Journaled)'
(ignore my size please, it is just example, you need a usb stick 8gb or larger and it will reflect that)
- Check Partition Map Scheme is 'GUID Partition Table'. Mine is 'Master Boot Record' (for windows) so I will have to change that.

Click Options and select 'GUID Partition Table', click OK. Skip this step if it is already GUID.
Now you have everything ready and filled in, click Apply.
Next, Under Restore tab:

Double click the .iso file on your desktop to mount it. A pop-up window will appear as well as the volume on the left menu. Ignore the pop-up window.

- Drag your USB partition (which you have now renamed) onto 'Destination'. Again, green + button will appear when it is able to.
- Click "Restore" button.
- The process will take some time, mine took about 55 minutes.
Your usb stick should be ready after it has completed restoration.
To boot from the usb stick, shut down or restart the computer and hold Alt/Option button while starting up (before the chime). This will take a few moments so keep your finger on it.

If successful, you will be able to choose the startup disk to boot from. Use the arrow keys to choose the USB Mac OS X Installer and hit enter. The language options will appear and you can do whatever you need to, by using the options in the top menu.
Hope this helps!
Tuesday, May 12, 2015
DECORATING A MIRROR WITH VINTAGE

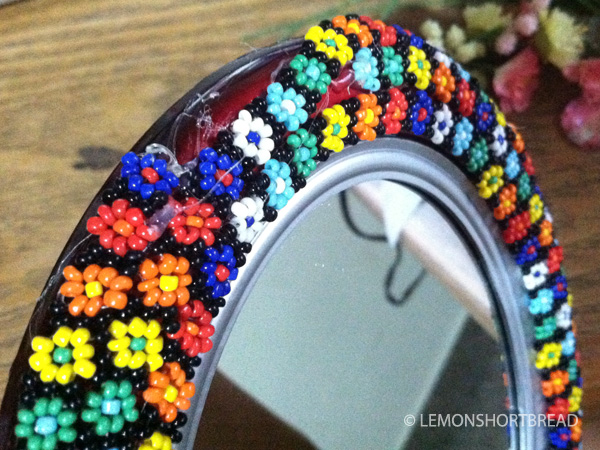
I purchased this plastic mirror last minute for a jewellery booth many years back, and since I disliked how tacky it looked, it was immediately put away after that event so I didn't have to look at it lol.
Anyhow I re-found it and decided to 'deco-den' it just because. This is not my original idea by the way. When I was an intern (around 1999) at a local bags & accessories company, the boss requested me to decorate two table mirrors as frou frou-ish as I could, with cabochon and ric rac samples and scrap pink feathers because we had just revamped the stores with a fixed colour scheme. Haha, good times. Best thing was customers asked if they were for sale... unfortunately no. The mirrors did manage to get customers to stop by the shop so that was good.




Tuesday, March 24, 2015
COLOURING WITH MARKERS ON INKJET DIGI STAMPS

Since most inkjet ink is water-based, I also worry about it smudging. I am currently using an Epson inkjet printer (XP-402) with its Epson Home Claria inks (model 177) - thankfully I did not have any problems! In fact I sprayed fixative at first to seal the lines but that seemed to make blending difficult. In this blogpost, I did two tries - one with fixative and one without.
First let's look at the one sprayed with fixative. You may get different results depending on the inks and markers you are using. I am using ordinary cartridge/ cardstock paper in A4 - it is called Drawing Block paper here in Singapore, the inexpensive common kinds they use at school.


https://www.etsy.com/listing/227203390/
Next is the no-fixative-on-printout experiment, pretty straightforward so I'll just show the finished result since it was night by the time I finished colouring. Reprinted the image on a new sheet of cartridge paper and waited for it to dry. Coloured with markers directly on top and the lines stayed put! The Epson 177 model ink cartridges are not too expensive and in the lower priced range. Quite happy with my printer by the way - it's got wifi. This time I didn't use Pearl White for the skin.


Wednesday, February 4, 2015
HOW I MAKE DIGITAL STAMPS & BOHO GIRL

For this post I will show you how my Lemon Shortbread digi stamps are made. This one was a bit more tedious than usual.
Naturally I can take the simple route: scan, fix the levels, clean it up a bit and done; but these days I've gotten used to clean sharp lines. They look like vector and print out very nicely, but they are all raster.
Why bother?? Well just in case I need it for something larger, it'll save me some headache later on if I do everything right the first time round. This was a lesson learnt from previous experience by the way. Also I make adjustments digitally such as symmetry (one of my main problems in drawing freehand) and mistakes. When you draw something digitally it contrasts too much with the original raw lines done on paper so once you start, you have to fix the entire thing to make them match. Maybe it's just me.


I knew before embarking on these crazy amount of beads was going to be a lot of work, but on that day I was feeling particularly OCD... later regretted =)

Not good at drawing circles, especially not digitally. I use a wacom by the way. The lines are too fuzzy so I redrew on top, or entirely erase and redraw.

Subscribe to:
Posts (Atom)